My Land Rover Defender

My Land Rover Defender
200Tdi 110

The rear on my vehicle

The rear on my vehicle
Not bad for 16yrs old

The rear seats

The rear seats
Re-upholstered by myself

Discovery 2 Seats

Discovery 2 Seats
Really comfortable

Defender gets hot, when working!

Monday, March 15, 2010


Viscous Fan Hub Replacement.

I had been using the Defender and on occasions the temperature needle would get near to the ¾ mark on the gauge causing me to panic. I had been flushing the radiator through, every time I changed the coolant, and also had changed the thermostat. This did not cure the problem, until I red a thread of  a Land Rover forum stating the symptoms could be the Viscous Fan Hub not working.
The Viscous Fan Hub is a clutch style mechanism with fluid contained within. When the fluid gets hot, the viscosity of the fluid changes and it moved to another part, causing the clutches to engage and turn the fan blades when the engine is hot.
A test is when you have run the engine for about 20 mins, or when the temperature gauge is ½ way, turn the engine off and open the bonnet. Make sure it’s not running. Try and turn the fan blades, if they are hard to turn, then the hub is working, however on mine it was just spinning with no effort needed. Obviously this unit had failed.
I tried buying the fluid, which is silicone oil from Toyota and drilling a hole in the front, and filling it up with the fluid, then plug the hole. This made it stiffer, however it was not working properly, so a new unit was required.
I purchased one from the UK at $80-00 Aus delivered. $100-00 cheaper than here in Aus.
Here are the steps to change the Viscous hub on a 200 Tdi Land Rover Defender.
The New hub

First of all ensure the item is the correct part. In this case part no. ETC7238
Then you need to get the tools ready.
1.    a Fan Hub spanner 32mm
2.     a 10mm Socket and Ratchet
3.     A bar round enough to fit in the hole on the fan pulley to lockit.


Once you have the tools it will take about 10 minutes tops to do, it only took me 5 mins, and its easy to do.

Place the 32mm spanner on the fan hub nut, and place the small bar into the hole to the pulley.

Remember the nut is a left hand thread, so you will need to turn the spanner towards the nearside of the vehicle and it should come undone. (Clockwise looking from the front)

After it is loose, you should be able to undo it by turning it with your hand, once it’s off withdraw the assembly between the cowl and engine, ensuring you don’t damage the fan blades.

Once removed, Place the hub on the ground face down, and you will see four 10mm studs,

Remove these. Loosen each one and then fully remove once they are all loose.


Now you can remove the fan blades from the hub, and place it onto the new hub.


When you put the studs back in, put a little thread lock on them to prevent the studs coming loose.


Tighten the nuts and then put it into the engine compartment, the same way it came out. Do not damage the coil spring on the front.


Hold the nut in line with the centre of the pulley, and hand turn it, top towards the offside ( Anti-clockwise looking from the front). Feel the nut biting onto the thread and tighten as much as you can by hand.

Once tightened, again with the 32mm spanner and the bar holding the pulley, tighten the fan hub nut until it is tight. An all is done. Ensure all tools are remove from the engine bay, and there we are.


Central Locking in the Defender

Monday, March 8, 2010


 Central locking installation in a defender 
Hi all, I was so pleased with my seats, I have now installed central locking to add further luxury to it, here are the steps I did when I installed it.

First get your central locking kit, my was $3-00 from a charity shop, or about 1 pound fifty Briitish money.

The only thing missing was the instructions and wiring diagram, but I found a wiring diagram on the net and installation was quite easy. but it did take four hours to install.

First check all the parts are in the box.


The next thing is to position your central locking relay unit, I chose in the fuse box as there was room and it's quite central.

Remove the panels on the door, by prying the clips and removing the screws from the door handle and window winding handle.


Heres the back door


I placed the actuator where I was going to have the unit and I then bent the bracket supplied in the kit, drilled the holes and riveted the bracket.


I then bent the rod to link the actuator to the locking mechanism.


Once i did this, I then screwed the actuator into place with the rod fitted, I then screwed the joint block onto the new and old rod.


I then wired the unit through the door and and placed the door panel back on.


I placed a grommit to prevent the wires getting worn by the sharp edges.

Then after I did the rear doors, I then did the front doors.


The front doors are different to the rear and the bracket looked like this.


Again after i had installed the unit and you have to make sure the rods are bent square and not on an angle other than 90 degrees.


On the fronts there is a hole on the lock mechanism, where you attach the new rod and check the actuator is fully in and the door is locked.


I then again threaded the wire through the door.


Once this was done I replaced the door panel and then wired in the relay unit to the fuse box compartment.


I placed a link fuse for the central locking system, and then closed all of the doors and hey prestow, my 1993 defender has working central locking. yipee. 

Discovery 2 seats do go, Eventually!


Work in prgress 
Well here we go here is the landy with the old tired seats.


Here are the Discovery II seats I had just purchased off ebay.


I need to measure the fittings and get ready to strip the new seats so they are able to fit into the defender. First here are the bottoms of the seats before the mod.

Protect the seat with cardboard, as I didn’t want to burn the seats, I then have cut the extra bits to make a flat surface to work to:-


Now i made some mounting bases out of box steel, these are 48cm long and the centres of the seat box holes need to be 44cm centres.


I have angled the ends, to retain strength and also to be able to access the bolts to fit the seats. I have then drilled holes in the seats runners to enable me to bolt then to the box steel.


I will fit the box steel first to ensure I have the seats correctly in position, but i will need to remove the centre cubby box to allow access and room to work, this was only held in by four screws and took about 10 mins to remove.

I will continue this tomorrow, but so far it had only taken me about an hour and a half to get this far.
boxed sections as the seats would of been too high and I wouldn't of got my legs under the Steering wheel, I found this out after I had installed the passenger seat!, The next thing to do is to remove the old seats.


Once the seats are removed, they are only held in by four 13mm bolts, the next part is to mark the holes on the seat box. I have used the rear inside bolt hole and kept the rails as far back as they can go. I have then drilled the new holes and had to get some heavy duty plate to strengthen the floor, I have gone over board, but a 100mm x 100mm plate of 2mm steel plate. I then removed the centre plate covering the gearbox to allow access to the underneath to access the bolts. Once drilled place the seat in and using the original spacers, bolt the seat in.

Here is the picture of the front mount.


an a picture of the rear mount, see I have had to cut the top part to gain access for the socket to tighten up the bolt.


Now the seats are bolted in, check the running of the seat belt, I have placed the passenger seat too close to the door pillar restricting movement as I used the outside holes. So I will have to alter this to use the inside mounting holes.
The seat box has been placed back, however I will need to make another one as this will need to be narrower to cater for the controls on the side of the seat.

Here we are:-


I will next tackle the rear seats, but I have measured and the old seats are 140mm and the discovery rears are 147mm, might get away with it, and I will have to modify the rear mounting to utilise the Discovery locking points.

Then once this is done, i will install central locking to make life easier.

Re upholster the Defender rear seats

First I cut and unstitched the panels and purchased some cloth which was as near as I could get. I then measured the seats in situ and made panels using the sewing machine and upholstery thread for strength.


Once I had made the panels I removed the seats from the defender, they were only held in by 2 bolts, so they were out within 10 mins.


I then dismantled the seats by unbolting them, and removing the base cover and panels stripping it down to bare bones.


I then stripped the side panels and placed onto the new material and make sure they are the right way around, as I wasted some material this way. Then draw around and then cut out of the new material.


Once you have cut them out, place the panels on the seat and mark where the side panels will go.


Once you have done that, sew the sides on, and once sewn, turn inside out and start to fit to seat, I did the base first then the back afterwards.


I then clipped the cover onto the base with metal clips and then recovered the bottom of the base with the panel, this is only screwed on.

I previously cut the old head rest fittings from the discovery II rear seats.


I then measured, I allowed 100mm from the edge of the seat and welded the fittings into place, make sure this is a good weld.


Once welded I added a bit extra foma to make the backs more comfortable, and to compensate for the head rests. I then fitted the top cover and then installed the head rest.

I then checked the finish and then fitted the seats back in.


And here we are the finished product, the wife loves them.


In all it took about a full day in hours to do, but its best to use new than old materials. 

The Land Rover Freak

Friday, March 5, 2010

Introduction:-

Hi to all and welcome to my blogger site. After many years of the wife getting onto me to create a blog, I thought I would and show and help other people who also own Land Rovers across the world.

It all starts somewhere and with me it was when my father who when I was five had his own logging business back in the UK. He bought an ex-forestry 1965 Land Rover series 2 Diesel.

It was cold in the winter, and drafty too, but I loved it. We would go to places that no other vehicle could get to, and some of the places were scary, especially at five.

I would go with my dad in the Land Rover when ever I could and I really enjoyed the lack of comfort, but having the ability of being able to go any where.

A few years later the desire for myself to have a Land Rover took a turn for the better, when a heavy goods vehicle ran up the back of the Landy, and the Police stated if he was in any other vehicle, he wouldn't be here today.

So I started to work getting a paper round and any other job I could to earn money and start saving for my dream.

I would work very hard and it paid off when I was fourteen years old and I was offered a 1958 Series 2 Land Rover with a perkins 4203 engine in it. I was over the moon and without looking at it I bought it.

The vehicle was rotten and I started to strip it down, however this was found to be beyond repair, however, it had good tires, and a good engine and Gearbox, actually the body work was good too. The things wrong, was a rotten Bulkhead and the chassis was shot.

So I started to strip it down, and then a Land Rover owner who knew my dad came by and offered me a good price for the engine and adapter plate. I snapped at this chance as it was more that what I had paid for it.

We then moved onto a small holding and the vehicle still, partially complete was towed to the new home in a barn, where it stood for about 1 year, not being touched.

I was at this stage in the Army Cadets and went away for two weeks when I was sixteen. I then returned and dad stated he had just bought a new tractor and wanted me to get it from the top paddock.

He gave me the key and as I walked into the paddock I saw a green beaten LWB Series 2 ex army Land Rover, it was brilliant, I was so pleased with it and drove it.

I loved it, it had a BMC 2.2 diesel engine in it, how ever it smoked as the vehicle was used on a farm, and was run on heating oil.

I started to trip it down as it needed a little welding on the chassis and the body was battered, but this is where my previous buy helped, I could use the body parts from that!.

Work started and then my dada said he had located an old London Taxi with a BMC 2.2 in it, he stated it had been rebuild, however as the bus company closed down, it just sat at the rear of a large bus shed. They wanted fifty pounds for it, so I snapped at the chance.

The taxi was then brought home and I removed the engine and at this stage the Landy was nearing completion.

It was now already to go and then by chance I sold the old London Taxi as scrap for fifty pounds, so the engine didn't cost a penny.

It was resprayed and I then took my driving test and passed. Yeah! i can drive on the road, taxed and MOT'd.

I then got offered an ex army series 2a 24 volt FFR, it had been taken to a friends place and shown as a demo, but the demonstrator had a crash into the owners car, an it just stood in the woods, where it lie for about six years.

One hundred pounds and I bought it. Emptied the carb of stale petrol, and cleaned the points, and it fired up after the third turn of the engine. Bloody good for 6 years sitting in a wood covered by brambles I'd say.

This was stored and kept for spares in the paddock.

I again went away with the army two years later and came back and dad had now bought me an ex-army Series 3 with a diesel engine with a damaged engine block as the previous owner had not put anti freeze in for the cold winter.

Dad got the engine welded and I drove this around for another two years, where I had saved enough money to by another one.

I went to Foley Land Rovers who were at this time at Sible Hedingham and looked around. They still deal in Land Rovers, but are now closer to London. I spoke to the owner who showed me his ex army vehicles and I fell in Love with a 1984 Series 3 FFR vehicle that had just come back from the first gulf camapaign in the early 90's.

It cost me one thousand two hundred pounds on the road, what a great deal, and I continued to use Foley until they closed the Sible Hedingham depot.

A year later the gearbox broke and I took it to RST in West Mersea Essex, to get it rebuilt, They did a fab job and it cost three hundred pounds and it was again on the road.

I then got married and then bought two other land rovers with the intention of rebuilding and then selling them on, but this didn't work and these were sold for export to Cypress, i think I lost a bit of money, but oh well.

A family then came along and I had to sell the FFR as I needed money to pay for the family. It was a real sad moment in my life, and I always felt something missing.

The family an I then moved to Australia and love it here, but there was that missing feeling, so when we arrived I bought a 1996 300 Tdi Discovery. It was okay for the first three months, then things went wrong until it died and we Part exchanged for a new car. The Discovery was very unreliable and the wife stated she did not want another Land Rover.

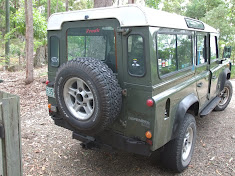
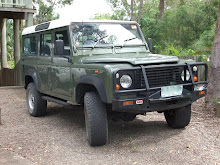
It took me two years to convert her, to which she said yes. I then bought a 1993 Land Rover defender 200 Tdi. The engine had just had $4000-00 spent on it and it was up for $5000-00. I knocked the owner down to $4000-00 and spent $900-00 to get it on the road.

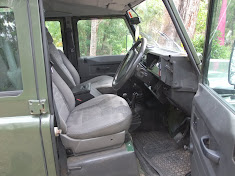
I have been gradually upgrading stuff, like Discovery 2 front seats, re upholster the rear seats, Side steps and now central Locking. I would drive this any day over the brand new car and will keep this for a long while yet. The only way I would get rid of it is if I get a new one. But I can dream.

That's enough about me feel free to look and enjoy and thank you for taking time to look at my blog.